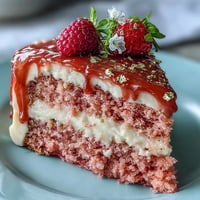
 Pin It
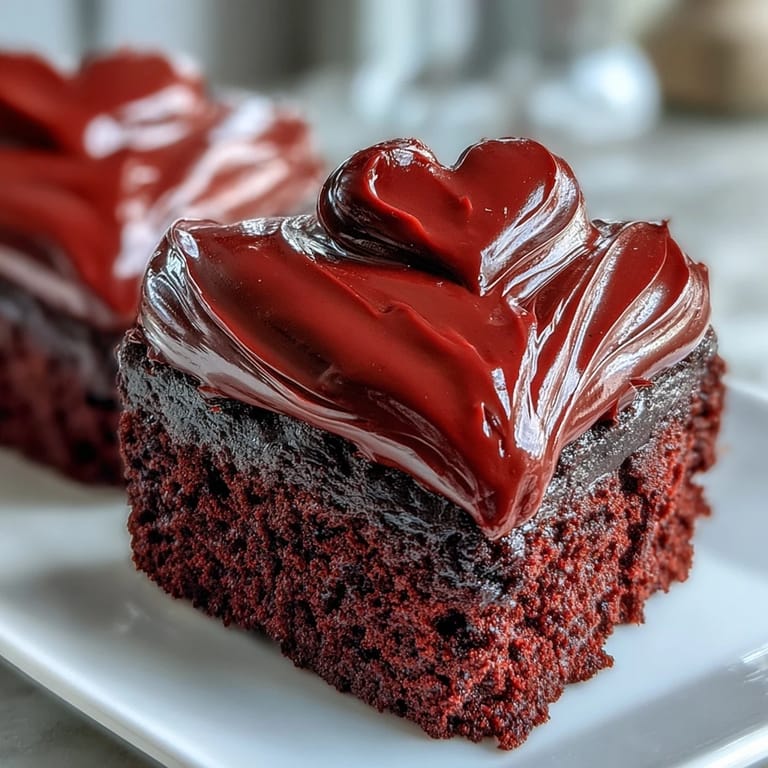
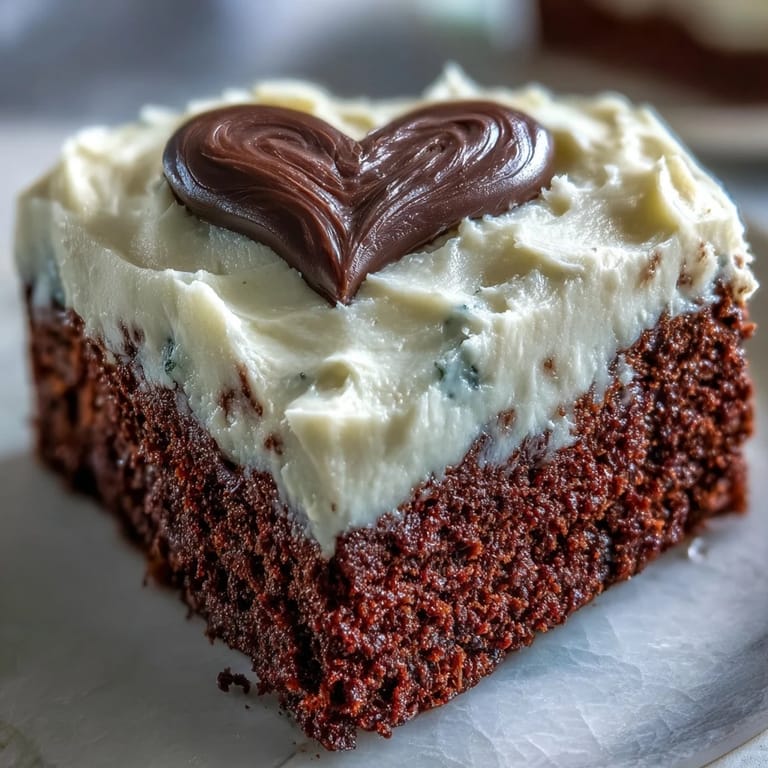
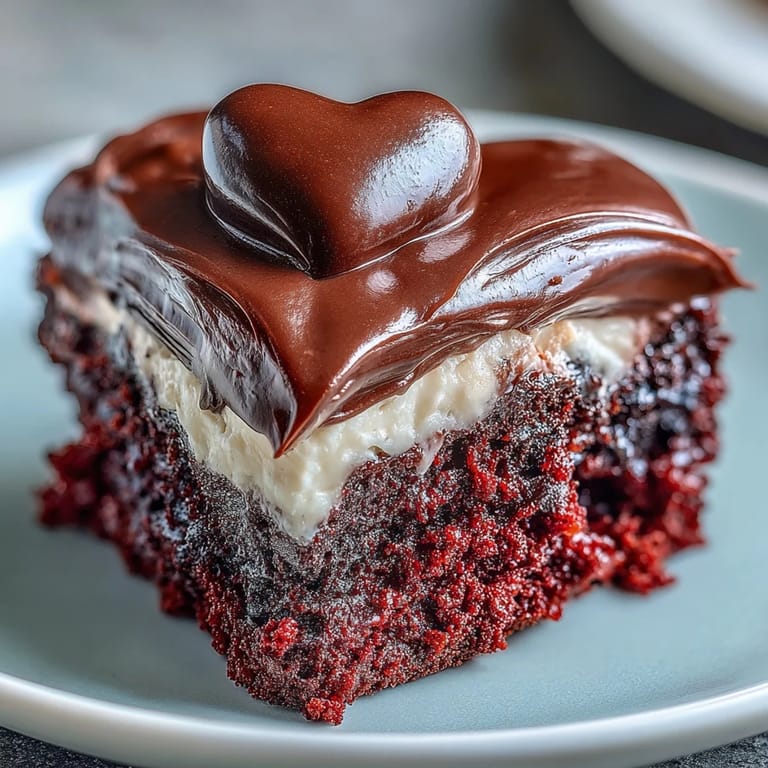
 My sister called me in a panic three days before Valentine's Day, asking if I could bake something that would make her girlfriend actually smile at a dessert for once. She wanted playful, not precious, and suddenly I was sketching Betty Boop silhouettes on my kitchen counter at midnight, realizing I'd committed to a cake that needed to look like a cartoon icon and taste like pure velvet. The red color had to be vibrant enough to show through without tasting like food coloring, the frosting needed that tangy cream cheese contrast, and the whole thing had to hold together on a heart-shaped platform. What started as a wild request became an obsession with getting every layer exactly right.
When I finally pulled that first cake from the oven, the kitchen smelled like cocoa and butter and something distinctly celebratory. I remember my hands shaking slightly as I turned the heart-shaped pans upside down, worried the delicate red layers would crack or stick, but they released onto the cooling racks like they'd been waiting to be unfolded. By the time I piped the Betty Boop silhouette onto parchment, my kitchen looked like a cartoon animation studio, and I knew this cake was going to make someone's Valentine's Day ridiculous in the best way.
Ingredients
- Cake flour (2 ½ cups sifted): Sifting matters here because it aerates the flour and helps create that impossibly tender crumb; lower protein content means the cake won't turn tough even with all that beating.
- Natural unsweetened cocoa powder (2 tablespoons): This hides in the background, adding depth and a slight bitterness that plays beautifully against the bright red color and sweet frosting without anyone tasting chocolate.
- Baking powder and baking soda (1 ½ teaspoons and ½ teaspoon): The vinegar trick activates the soda, creating tiny bubbles that make the cake rise gently and stay feather-light instead of dense.
- Fine sea salt (½ teaspoon): Salt amplifies sweetness and vanilla in ways sugar alone cannot, making every bite taste more like itself.
- Unsalted butter (1 cup plus ½ cup for frosting), room temperature: Cold butter won't cream properly, so pull it out an hour before you start; you want it soft enough that your finger leaves an impression.
- Granulated sugar (1 ¾ cups): The gradual beating with butter incorporates air and creates that fluffy texture that makes the batter feel alive.
- Large eggs (4), room temperature: Cold eggs won't emulsify smoothly into the batter and can cause lumps or separation; room temperature is non-negotiable.
- Buttermilk (1 cup): The acidity reacts with the baking soda to create lift, plus it keeps the cake moist and tender with a subtle tang.
- Red gel food coloring (2 tablespoons): Gel coloring is concentrated, so you get vivid red without adding extra liquid that would throw off the batter consistency; liquid coloring will make the cake watery.
- Pure vanilla extract (2 teaspoons): Pure extract carries deeper flavor than imitation; this is where you taste the care.
- White vinegar (1 teaspoon plus 1 teaspoon): The first activates the baking soda for lift, the second adds tang and tender crumb texture.
- Cream cheese (1 cup), room temperature: Cold cream cheese will be lumpy and refuse to blend smoothly, so let it sit out; this frosting depends on perfect emulsification.
- Powdered sugar (4 cups, sifted): Sifting removes lumps and prevents grainy frosting; you're looking for silk, not sand.
- Dark chocolate or candy melts (6 oz): Melted chocolate crisps up beautifully and holds its shape, creating that playful contrast between the soft cake and the snappy silhouette.
Tired of Takeout? 🥡
Get 10 meals you can make faster than delivery arrives. Seriously.
One email. No spam. Unsubscribe anytime.
Instructions
- Prepare your stage:
- Preheat the oven to 350°F and grease those heart pans thoroughly, then line the bottoms with parchment paper so nothing sticks and your beautiful shapes come out intact. Have all your ingredients measured and sitting at room temperature before you start mixing, because once you begin, the process moves quickly and you won't want to hunt for the eggs.
- Build your dry foundation:
- Whisk together the sifted cake flour, cocoa powder, baking powder, baking soda, and salt in a medium bowl, and really take time with the whisking to break up any clumps and incorporate air. This is your insurance policy against a heavy cake.
- Cream butter and sugar into clouds:
- Beat the room-temperature butter on medium speed for about a minute until it softens and lightens, then gradually add the sugar while continuing to beat for 2 to 3 minutes until the mixture looks pale and fluffy like frosting. You're whipping air into the butter, which is what makes the cake rise and stay tender.
- Add eggs with gentle hands:
- Drop in one egg at a time, beating on low speed just until each one disappears into the batter before adding the next; overmixing at this stage can make the cake tough. Scrape down the bowl sides with a spatula as you go.
- Introduce the red magic:
- Stir in the red gel food coloring, vanilla extract, and first teaspoon of white vinegar until the batter is evenly and vibrantly colored, with no streaks or pale spots. The batter should look like it was born red, not painted red.
- Alternate dry and wet ingredients like a careful dance:
- With the mixer on low speed, add one-third of your dry ingredients, then half of the buttermilk, mixing just until you see no flour streaks, then repeat with another third of dry ingredients and the remaining buttermilk, finishing with the last dry ingredients. Do not overmix or the gluten will develop and your cake will be tough; you're looking for just-combined, not perfectly smooth.
- Activate the lift with the vinegar soda reaction:
- In a small cup, mix together the second teaspoon of vinegar with the baking soda, watch it foam slightly, then gently fold it into the batter using a spatula; this reaction is what creates the light, airy crumb. Fold gently so you don't deflate the bubbles.
- Fill the pans and smooth like glass:
- Divide the batter evenly between your prepared heart pans, using an offset spatula to smooth the tops and ensure even baking. You want the batter distributed so both cakes will rise at the same rate.
- Bake with patience:
- Place the pans on the center oven rack and bake for 25 to 30 minutes, or until a toothpick inserted in the center comes out clean with just a few moist crumbs clinging to it. The cakes should smell incredible and spring back slightly when you touch the center.
- Cool with respect for the structure:
- Let the cakes rest in their pans for 10 minutes so they set slightly and won't fall apart, then run a thin knife around the edges to loosen them, invert them onto wire racks, peel off the parchment, and allow them to cool completely before you touch them with frosting. Warm cake plus frosting equals a melted mess.
- Make the frosting while you wait:
- In a clean mixer bowl, beat the room-temperature cream cheese and butter together on medium speed for about 2 minutes until smooth and completely blended, with no streaks. Gradually add the sifted powdered sugar and a pinch of salt, beating on low until the mixture is combined and fluffy, then add the vanilla extract and beat until it's silky.
- Stack with precision and patience:
- If your cake layers domed slightly, level them with a serrated knife using gentle sawing motions, then place one heart cake layer on your cake board or serving plate. Pipe or spread an even layer of frosting (about ¾ cup) over the top, place the second cake layer on top with a gentle press, and refrigerate for 15 minutes so the frosting sets and holds the structure.
- Crumb coat and chill:
- Apply a thin, sealing layer of frosting over the entire cake to trap any crumbs, then chill for 10 minutes before adding your final smooth layer of frosting. This two-stage frosting approach gives you a clean, professional finish with no visible crumbs.
- Create the Betty Boop silhouette:
- Place your printed or drawn Betty Boop heart stencil under a sheet of parchment paper and carefully pipe or brush melted dark chocolate over the outline, making sure to fill in all the details so the silhouette is solid and recognizable. Let it set completely at room temperature or in the refrigerator for about 10 minutes until it's firm and crisp.
- Transfer the silhouette with a light touch:
- Once the chocolate is fully set, carefully peel it away from the parchment starting at one corner and working slowly so it doesn't shatter, then gently lift it onto the center of your frosted cake. Press it very lightly into the frosting so it adheres without sliding.
- Decorate and finish:
- Add frosting rosettes around the cake edges, or sprinkle edible glitter and red sugar pearls to echo the playful Betty Boop theme, then refrigerate the entire cake for 30 minutes before slicing. Warm your knife under hot water and wipe it dry between cuts for neat, clean heart shapes.
 Pin It
 I watched my sister's girlfriend cut into that cake on Valentine's Day, and the expression on her face when she saw the bright red interior paired with the chocolate silhouette was worth every careful step and late-night sketch session. She took a bite and actually laughed, because the tartness of the cream cheese hit first, then the softness of the cake, then the snap of the chocolate, all in this perfect sequence that made sense. That's when I realized this cake wasn't just pretty—it was thoughtful, and that's what made it matter.
The Science of the Red Bake
The magic of this cake lives in the combination of acidic buttermilk, white vinegar, and baking soda, which creates a gentle, even rise and keeps the crumb tender instead of tough. The red color appears slightly more brown in the batter because of the cocoa powder, but once it bakes, the Maillard reaction adds depth and prevents the cake from tasting like pure food coloring. The minimal cocoa powder is intentional—just enough to add complexity without making anyone taste chocolate, which would fight the bright, almost berry-like sweetness of the red cake against the tangy frosting.
Why the Frosting Matters as Much as the Cake
Cream cheese frosting is trickier than buttercream because it's more delicate and softer, which means it requires patience and proper technique to look smooth instead of streaky and broken. The key is beating the cream cheese and butter together first until they're completely unified before you even touch the powdered sugar, and then adding the sugar gradually so you don't overwhelm the mixture and cause it to break. This frosting tastes slightly tangy, which is exactly what saves this cake from being one-note sweet—it creates a conversation between flavors instead of a monologue.
Decorating Without Fear
The Betty Boop silhouette looks intimidating, but it's actually forgiving because you're working with melted chocolate on parchment, which means mistakes can be scraped off and re-melted. The stencil does most of the work for you, so all you need to do is carefully pipe or brush chocolate over the outline and let time do the setting. The chocolate contrasts beautifully against the bright red cake and pale frosting, creating visual drama that makes people gasp before they even taste it.
- If your chocolate silhouette cracks when you peel it off, you can use a tiny dab of frosting to glue the pieces back together on top of the cake and nobody will notice.
- Practice the stencil transfer on parchment scraps first if you're nervous, because once you see how easily the chocolate releases, your confidence will skyrocket.
- Warm your offset spatula under hot water and dry it completely before smoothing the final frosting layer, as this creates a mirror-like finish that makes the chocolate silhouette pop even more dramatically.
 Pin It
 This cake is the kind that makes people remember you made it, not just that they ate cake. Serve it slightly chilled so the frosting stays firm and the chocolate silhouette stays crisp, and watch what happens when someone bites through all those layers of flavor and texture at once.
Recipe FAQs
- → How do I achieve vibrant red color without thinning the batter?
Use gel-based food coloring instead of liquid. Gel provides concentrated pigment without adding moisture that could alter your batter's consistency. Start with a small amount and add more until you reach the desired shade.
- → Why is vinegar added to the cake batter?
White vinegar activates the baking soda, creating a chemical reaction that produces carbon dioxide bubbles. This results in a lighter, more tender crumb. It also enhances the red color development when combined with cocoa powder.
- → Can I make the chocolate silhouette decoration in advance?
Absolutely. Prepare your Betty Boop silhouette on parchment paper and store it flat in an airtight container with wax paper between layers. Keep at room temperature in a cool, dry spot for up to 3 days before placing on your frosted cake.
- → What's the purpose of the crumb coat technique?
A crumb coat is a thin initial layer of frosting that seals in loose crumbs. Chill for 10-15 minutes until set, then apply your final thicker layer. This ensures a smooth, professional finish without visible crumbs marring the surface.
- → How should I store leftovers and how long will they keep?
Cover the cake tightly or store slices in an airtight container in the refrigerator. The cream cheese frosting requires cool temperatures to maintain structure. Properly stored, this dessert stays fresh for up to 4 days. Bring to room temperature 20 minutes before serving for optimal texture.
- → Can I substitute regular cocoa powder for natural unsweetened cocoa?
Natural unsweetened cocoa powder is recommended as it reacts with the vinegar and baking soda to help the red color pop. Dutch-processed cocoa has been alkalized and won't provide the same chemical reaction, potentially resulting in a duller hue.