 Pin It
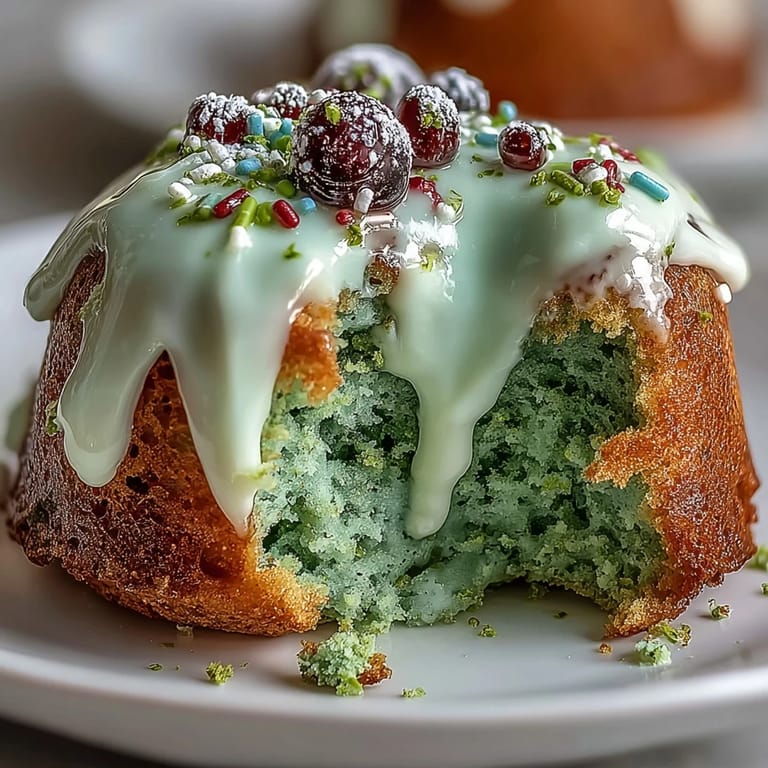
 The first time I experimented with matcha in baking, the scent of grassy green tea laced with vanilla surprised me—it was oddly invigorating for a morning in my tiny kitchen. I’d been tasked with bringing something 'playful but elegant' to a friend’s birthday brunch, and the idea of a smash cake in miniature form caught my imagination. The result was this fluffy, vibrant matcha cake dressed up in swirls of vanilla frosting, just waiting for someone to dig in with their hands. Watching guests giggle while cracking the soft layers rather than slicing neat rounds felt delightfully rebellious. When I tasted the crumb, I knew this cake would become my secret brunch weapon.
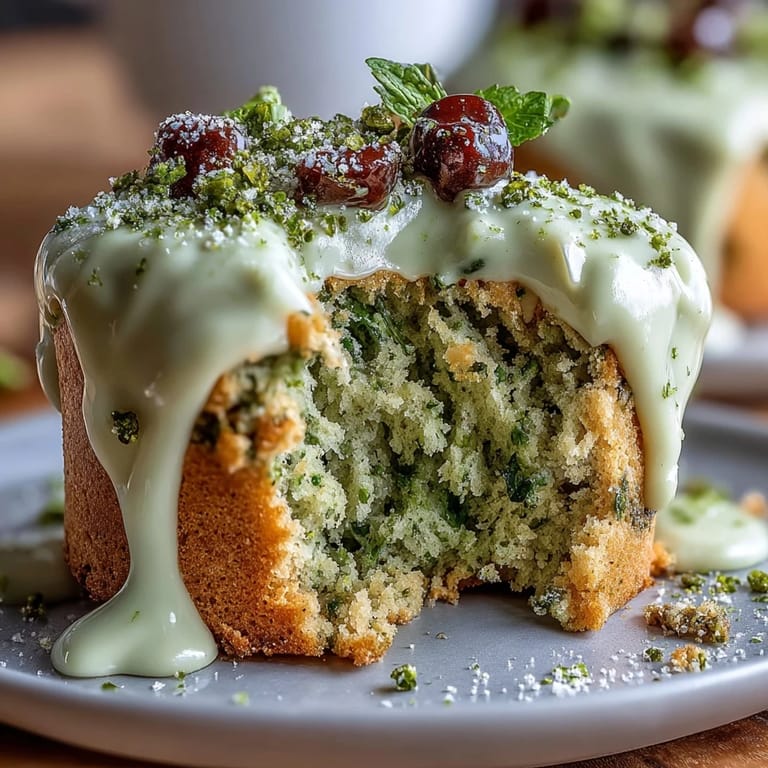
One Sunday, my roommate and I ended up making this cake after a last-minute decision to throw a 'micro' birthday party—with just enough cake for everyone to have seconds. We nearly forgot the berries on top, only to remember as we heard the oven timer ring. Decorating together, both of us laughing and comparing whose frosting was smoother, made the morning feel extra special. Those unplanned, slightly messy moments are what I remember most fondly. Smudges of matcha in unexpected places just marked evidence of a good time.
Ingredients
- All-purpose flour: Creates a light but sturdy crumb—sift for the fluffiest bite.
- Granulated sugar: Provides sweetness and ensures a tender cake; I once tried reducing it but the balance was off.
- Baking powder & baking soda: These work together for just the right rise—too much and your cake can turn soapy.
- Salt: Enhances flavors and balances out the matcha’s earthiness.
- Matcha powder (culinary grade): Gives that signature green hue and tea aroma—sift it to avoid bitter lumps.
- Whole milk: Keeps the cake moist; bring it to room temp so the batter mixes smoothly.
- Large egg: Binds everything together and helps with structure—don’t skip!
- Vegetable oil: Yields a super soft texture, plus it makes leftovers (if any) keep well.
- Vanilla extract: Softens the matcha and brings gentle sweetness to both cake and frosting.
- Unsalted butter (for frosting): Your key to that creamy, dreamy finish—make sure it’s completely softened.
- Powdered sugar: Sifted so you get a smooth, lump-free vanilla frosting.
- Milk (for frosting): Adjusts the frosting’s consistency, just a splash makes all the difference.
- Pinch of salt (for frosting): Prevents the frosting from tasting cloying and sharpens flavors.
- Optional Toppings—sprinkles or fresh berries: Add color, sparkle, or a fresh note right before serving.
Tired of Takeout? 🥡
Get 10 meals you can make faster than delivery arrives. Seriously.
One email. No spam. Unsubscribe anytime.
Instructions
- Prep the pans and oven:
- Set your oven to 350°F (175°C) and line both 4-inch pans—there’s genuine joy in peeling parchment from a golden cake later.
- Sift and mix dry ingredients:
- Combine flour, sugar, baking powder, baking soda, salt, and matcha in a bowl; sift so the matcha blends in evenly and avoid any green streak surprises.
- Combine wet ingredients:
- Whisk milk, egg, oil, and vanilla in a separate bowl—the mixture should look pale and glossy when ready.
- Bring it all together:
- Pour wet over dry, then gently fold; stop when you see the last trace of flour—overmixing is the enemy of tenderness.
- Portion and smooth:
- Divide the batter between the pans and use a spatula to level the tops; perfection isn’t necessary, but even cakes stack so much easier.
- Bake and check:
- Bake for 15–20 minutes until a toothpick comes out clean—a faint earthy aroma means the matcha is blooming perfectly.
- Cool the cakes:
- Let them cool five minutes, then turn out onto a wire rack; this pause prevents soggy bottoms and rewards patience.
- Whip up the frosting:
- Beat softened butter, gradually add powdered sugar, then milk, vanilla, and salt—creaminess happens fast, so keep tasting until it’s swoon-worthy.
- Layer and frost:
- Stack cakes with frosting in the middle and around the outside—embrace the rustic look, it makes smashing even more fun.
- Decorate and serve:
- Scatter sprinkles or berries right before serving, then stand back and let the birthday chaos begin!
 Pin It
  Pin It
 After the first successful brunch-smash, one of my friends confessed she never liked matcha... until this cake. Watching her break off a chunk—frosting on her fingers and a grin on her face—reminded me that joy in baking isn’t just about technique, but the laughs and little surprises at the table. Sometimes, cake becomes a memory far sweeter than its sugar content suggests.
About those Sometimes-Messy Cake Layers
Don’t panic if your layers are a little wonky or your frosting isn’t perfectly smooth. These mini cakes are meant for smashing, after all. In my experience, honest presentation gets the most cheerful reactions. The best moments are when someone inevitably sneaks a taste of frosting straight off the spatula. It all adds to the brunch theatre.
Making It Your Own
Try adding a hint of lemon zest to the batter for brightness or swap out vanilla frosting for a tangy cream cheese version. I once freestyled with a handful of chopped strawberries pressed into the center—the color pop was gorgeous. Small batch cakes invite creativity, so don’t be afraid of happy accidents. The only true mistake is not enjoying the process.
Serving and Storage for Maximum Freshness
Whenever I plan ahead, I store the undecorated cakes well-wrapped at room temp to keep them soft. Frost right before serving for the freshest vibe and to avoid soggy layers. While leftovers are rare, a quick zap in the microwave revives any forgotten slice.
- Layer cakes cool better if you remove them from pans after 5 minutes.
- Store extra frosting in the fridge—great on toast the next day.
- Always add sprinkles or berries just before bringing out the cake.
 Pin It
  Pin It
 May your next birthday brunch be filled with laughter, green crumbs, and a cake that’s as fun to eat as it is to make. Here’s to small cakes and big celebrations!
Recipe FAQs
- → What matcha is best?
Use culinary-grade matcha for baking: it gives vibrant color and a balanced green-tea flavor without the higher cost of ceremonial grades. Adjust quantity to taste for a milder or stronger profile.
- → How do I avoid a dense crumb?
Do not overmix once wet and dry are combined. Gently fold until just combined to keep the cake light and airy. Room-temperature egg and milk help with even emulsification.
- → Can I make this dairy-free?
Yes — replace whole milk with a neutral plant milk and use vegan butter for the frosting. The cake texture remains tender; chill the frosting slightly if it softens too much.
- → How long should I bake the mini pans?
Bake 4-inch pans for 15–20 minutes at 350°F (175°C). Start checking at 15 minutes; a clean toothpick in the center indicates doneness. Oven variances may require a few extra minutes.
- → How do I get a stronger matcha flavor?
Increase matcha by about 1–2 teaspoons, but taste first if using a particularly bold powder. Too much can introduce bitterness, so balance with a slightly sweeter frosting if needed.
- → How should I store leftovers?
Cover the cake loosely and refrigerate for up to 2 days. Bring to room temperature before serving to restore tenderness. For longer storage, wrap slices tightly and freeze for up to one month.
- → Tips for a clean smash or slice presentation?
Chill the assembled cake briefly to set the crumb and frosting. Use an offset spatula for smooth icing and a hot, clean knife for neat slices. Lightly dust with matcha or add berries for contrast.